Showing posts with label Studio Calico. Show all posts

Saturday, April 1, 2017

Holy cow! A card!


I needed to make a card for the person I am sponsoring to receive Baptism and Confirmation at the Easter Vigil.  This card will be opened during retreat next week, and it needed to contain some inspiration.

I used Bazzill Kraft as my base.  The first panel is SEI linen paper.  Then I used my Stampin' Up! banner dies and embossing folder with some Bazzill red and Neenah Solar White.  The sentiment is from PTI's A Cheerful Heart set.  I stamped with Simon Says Stamp Intense Black ink, which is quickly becoming my favorite.  I felt something was needed up top, so I stapled a bit of sheet ribbon and placed an Ali Edwards glittery white star, followed by a Studio Calico Kraft star to pull in the base.

It felt good to make a card again!

Saturday, February 22, 2014

Shut the Front Door

Yes, I bought the entire Studio Calico Home Sweet Home stamp set JUST for this stamp.


This card has some stories.  First, the story of the Movers and Shapers.

A few years ago (yes, years), I bought some Stampin' Up! Movers and Shapers dies.  One of them was the shape of an ornament stamp that I had and was cutting by hand every time I used it.  I thought I could just stick them through my Cuttlebug.  Looked simple enough.

I did not realize that there was a Sizzix XL die into which the little dies were designed to go.  Clearly the dies were not a priority.  Then I got a Big Kick, and I thought I should probably figure these out.  And figure I did.  Here's a brief video to show how they "roll" (pun intended).


So, I ordered the larger die off of eBay, as it has been retired from SU!.  It came today, and I was so excited to use it!  And then...I realized I needed XL plates to run it through.  Totally being Punk'd!  Off to Michaels I went, spending the rest of my Christmas gift card and using my 40% off coupon.  I now had everything I needed.  Woot!

I saw a fellow teacher at Michaels who notes that my purse matched the outfit I was wearing.  TOTALLY coincidental, but inspiration for my color choice.  Rick Razzleberry it is!  I cut the card, stamped the sentiment, and thought putting the house inside was pretty funny, in a clean and simple sorta way.


I used my new Stampin' Up! washi tape to give the front a little pop.  I really like this card a lot!

Thursday, February 20, 2014

You Make Me Happy...

...when skies are gray.

So, the whole time I am making this card, that's what I am singing.  That line.  Over and over.  My crafting cadence.
The details I adore about this card were hard to photograph as I looked at the card in its entirety, so I tried to photograph snippets.  Here is the whole card (or the best I could do at 11:30 PM).


This card is a combination of multiple materials.The embossing on the base is Cuttlebug's Dots embossing folder.  The chalkboard style paper is Chevron/Chalkboard from We R Memory Keepers.  The stamps come from Stampin' Up! Studio Calico, and Unity Stamps.  The washi is from We R Memory Keepers.  I used Stampin' Up! Craft White ink, Stampin' Up!'s chalk pen, and Stampin' Up! Summer Sun ink.  I popped up the cloud and the word "HAPPY" and the chalkboard base with Stampin' Up! Dimensionals.  I love this phrase that I got with my newly-earned "See Ya Later" set from Stampin' Up!'s Sale-A-Bration promotion.  I just got it today, and it needed to see some ink.  I was hoping to use my Bitty Banners framelets in my Big Kick, but I must warn that this particular stamp was a tough one from which to pop that word.  The "y" in the word "you" was very close to the word "HAPPY," so I needed to cut the banner by hand to get it thin enough to stand alone.  Coloring this stamp also did not work well.  The markers just would not give a good image.

I LOVE how this turned out.


Tuesday, August 6, 2013

Project Life Week 18 and Some Observations

Today, I got to craft.  And it's my birthday.  Woot!  Happy birthday to me!

OBSERVATIONS: From afar, Project Life seems fairly restrictive.  However, I have allowed myself some free reign in layouts that I did not think I would, such as using different sized page protectors in one layout.  Enter, this week.  Finally, after 18 weeks, I decided to let pictures drive the layouts instead of page protectors.  I felt that freedom that I would print what I wanted and figure out placement later.  And that actually worked.  No one is more surprised than I.  Here is this week's DPS using a 12 x 12 page protector with, well, one that isn't 12 inches wide.


Crazy cropping for a crazy nighttime shot.  One of these days, I will patiently await natural lighting when I take my photo.


I purchased some wood veneers from Studio Calico as well as stickers that match the sizes.  Hexagon joy!  Getting a lot of mileage with my Pebbles alpha stickers as well.


Yep, I am totally in love with the Project Life Kraft edition.  No joke.  And this blue?  Ah!  I am also in love with using my phone together with Photoshop and RadLab.  This trifecta of awesome has totally changed my picture capturing abilities.

Now, some honesty:
This is what my craft table looks like right now.  No doubt that it is well used, as opposed to my cobwebs of last summer.

This is my PL album after 18 of 52 weeks!  I am thinking another album will be needed before the year is up.

I am caught up!  Just in time for school to crash its way in.


Sunday, August 4, 2013

Project Life Week 16

Slowly enjoying putting vacation pages together.  Used my new Kraft core kit as well as some new Studio Calico wood veneers and Pebbles alphabet stickers.  I also used some Memory Flaps from CTMH to include multiple fill in the blank cards from the family members as well as a way to tie in the strip of 4 x 4 Instagram shots.


You can send your Instragram shots straight to Walgreens photo using your phone app.  They will print as 4 x 4.  Mine came as matte finish, but I am sure you can change that and I was not paying attention.  Regardless....so much easier that the way I was printing them, which required placing them on a 4 x 6 layer in Photoshop and saving them after cropping, filtering, etc.


These journaling fill in the blank cards are part of ALi Edwards' Hello Story class as a way of journaling that is quick and easy, yet meaningful.

On to Disney!

Sunday, July 14, 2013

Hello Story - Timeline Story Structure


I began Ali Edwards' Hello Story class from (you guessed it) Big Picture Scrapbooking this week.  For the next 11 weeks, I am privileged to watch videos from one of my favorite creative minds in the industry...in the comfort of my own home.

Each week, Ali will focus on what she terms "story structures," or ways to tell the story that scrapbooking is about.  This week was focused on using a timeline to tell a story.  Ali presented several layout springboards, but we were not bound to them by any means.  My layout is inspired by a timeline she did of her own life.  I chose to do a timeline of Friday's happenings with some friends.


Ali provided the timeline .png file.  She also provided the "my life" file, which I cut with my Silhouette.  Let me express how IMPORTANT the paper was for this thin cut.  I tried Bazzill Orange Peel and it was not a good time.  I went back to Neenah Solar White cardstock.  I might not use anything else in that machine!  It was perfect!

As we went throughout our day on Friday, I noted on my iPhone what happened from the time I got up until the time I finally was back in bed.  When something came up, I just jotted it in my note.  Then I decided what the most important "story" part of the day was, and I created the time line events.

The biggest decision was to take the Nikon or not.  Scott insisted that I should not, as he feared it would be confiscated.  Hindsight: Heck ya, I should have taken it!  Thank goodness for my pal Lisa, as the concert pics were all taken off the "jumbotron" with her camera.  No, we were NOT that close to the stage!  Still, she got amazing pics.  It was hard to choose!  I took the pic of Taste of Chicago and the selfie of all of us in our seats with my iPhone.

I knew I needed to determine how to make this mesh with a timeline layout.  I created, at first, a 12 x 4 canvas in Photoshop, and quickly learned that would not work for the pics I chose.  I changed it to 12 x 8, so most of the pics are cropped at 4 x 4 with 300 dpi.  The top one could not be square... it was just too awesome of a shot of the enormous, car-themed stage surroundings with the silhouette of the band...gave me goosebumps!  I then layered Ali's provided blank timeline onto the side and printed on glossy paper.

I used a couple more ideas that were Ali-inspired: I adhered the image to a piece of patterned paper from Farm House Paper Company and then wrote each event with white gel pen. I used Stampin' Up! linen thread and SU! Hodgepodge Hardware brads for the event lines.  I literally just poked and threaded right through the paper.  I guesstimated (gasp!) where I wanted the events to go, trying to give more vertical space to things that took a while, but no real "measuring out."

I used my Silhouette to cut "my life," and used Dear Lizzy Thickers and AC Remarks Autumn alpha stickers for "it's."  Bon Jovi fans understand that is the name of a song of theirs, and it's one of my FAVORITE songs, so I thought that was perfect. 

You cannot see the date stamp, but I tried to use my Studio Calico rotary date stamp using the word "Epic."  Stamped it a few times with SU! white craft ink, but it just kind of faded, so I stamped the date by itself as well.  Almost looks like an intended part of the page.

I am pretty pleased, and this will be an addition to this week's Project Life.  On the "flipside," I will be adding some memorabilia from the event.


Friday, July 12, 2013

Project Life Weeks 13 and 14


I am finally finished with weeks 13 and 14.  The hold up?  Me and my bright ideas.  I purchased a We R Memory Keepers divided page protector that looked fabulous in theory.  In the center, it had a 6 x 12 (or so I thought) space, surrounded by 3 x 3 slots.  Enter the fact that I did not (note "did") have a wide format printer.  I found that printing larger prints is no small expense.  I have kicked around the idea of a wide format printer for years.  This inspired me to finally make the leap.  So, I am now the owner of an Epson Work Force wide format printer.  If only that were "enough" to print things out at the proper sizes.  I bought photo paper that I now know was WAY bigger than I need, so there was a lot of exacto knife cutting (my paper trimmers like 12 inches or less.
Then, I found that the middle slot is actually 6 x 12.5...AFTER I printed a 6 x 12...yeah.  I was thrilled.  Three prints later, I got something that worked.  I do, thank God, love these pages:


Week 13


Hexagon cards are from the Honey Edition of Project Life.  I loved the way they looked.  Also added some patterned paper (October Afternoon Travel Girl- Directions) and washi tape (Jenni Bowlin) on the lower left pic to mat the Instagram shot of Ignatius.


Here's the lovely page protector.  I went with LOTS of pics on this page.  Denny's was kind of a big deal with Max. :)


A close up of the larger pic of the July 4 DPS.  I loved this quote and thought it was perfect for the picture of the boys watching the fireworks.


Week 14 DPS


I printed the middle picture too short, so I added some of the patterned paper I had been using.


I used a lot of the same piece of 12 x 12 paper (We R Memory Keepers Red White & Blue- Patriot), which was totally cool.  I used almost the entire piece.  I also used some Studio Calico star stickers on the page.


New month means the monthly divider.  I also added some flyers from our crafting trip.


Monday, June 24, 2013

Project Life and the Use of New Supplies -or- Who am I and what did I do with JoLynn?

The remainder of Week 11, finally finished by one Maximilian Plato:


I actually added some arrows to this page...just realized it now.  Ah well.  Anyway, very cute turnout overall.  Well worth the efforts!

And now, Week 12, featuring the use of new material.  Wow.  Unbelievable.  I usually put stuff away and forget I have it!


I got a great deal of stuff at the Sidewalk Sale at The Scrapbooking Studio this weekend.  Kim and I literally went kind of like little tornadoes through their stuff.  We had a limited amount of time.  I spent just under $25 and got TONS of great things, many of which are on this page.  How fun are the raindrops and clouds (that American Crafts!).  Really excited that I branched into writing on labels.  Seems to be trending at the moment.  Going outside of my little box!


Note: An entire sheet of 12 x 12 patterned paper was won over simply by that title card.  Say Yeah!  CRACKED me UP!


Saturday, June 8, 2013

Happy Saturday!

The sun is shining and it's a cool and crisp day here in Central Illinois.  My eight year old still has his mind set on the pool, even though it has just hit 70 degrees.

Crafting has been occurring quite a bit as of late, so I thought I would drop in some ideas and Project Life updates.

I am happy to report that my buddy Kim is now well on her way to independence with her PL album for her granddaughter's first year.  It looks awesome, and she is caught up through May!  She's on a roll!

First spread of Harlow's album

Used some Making Memories alpha stamps to create this calendar

Kim was at first intimidated to journal, so she found the texts between she and her daughter when she awaited labor news and we printed those up.

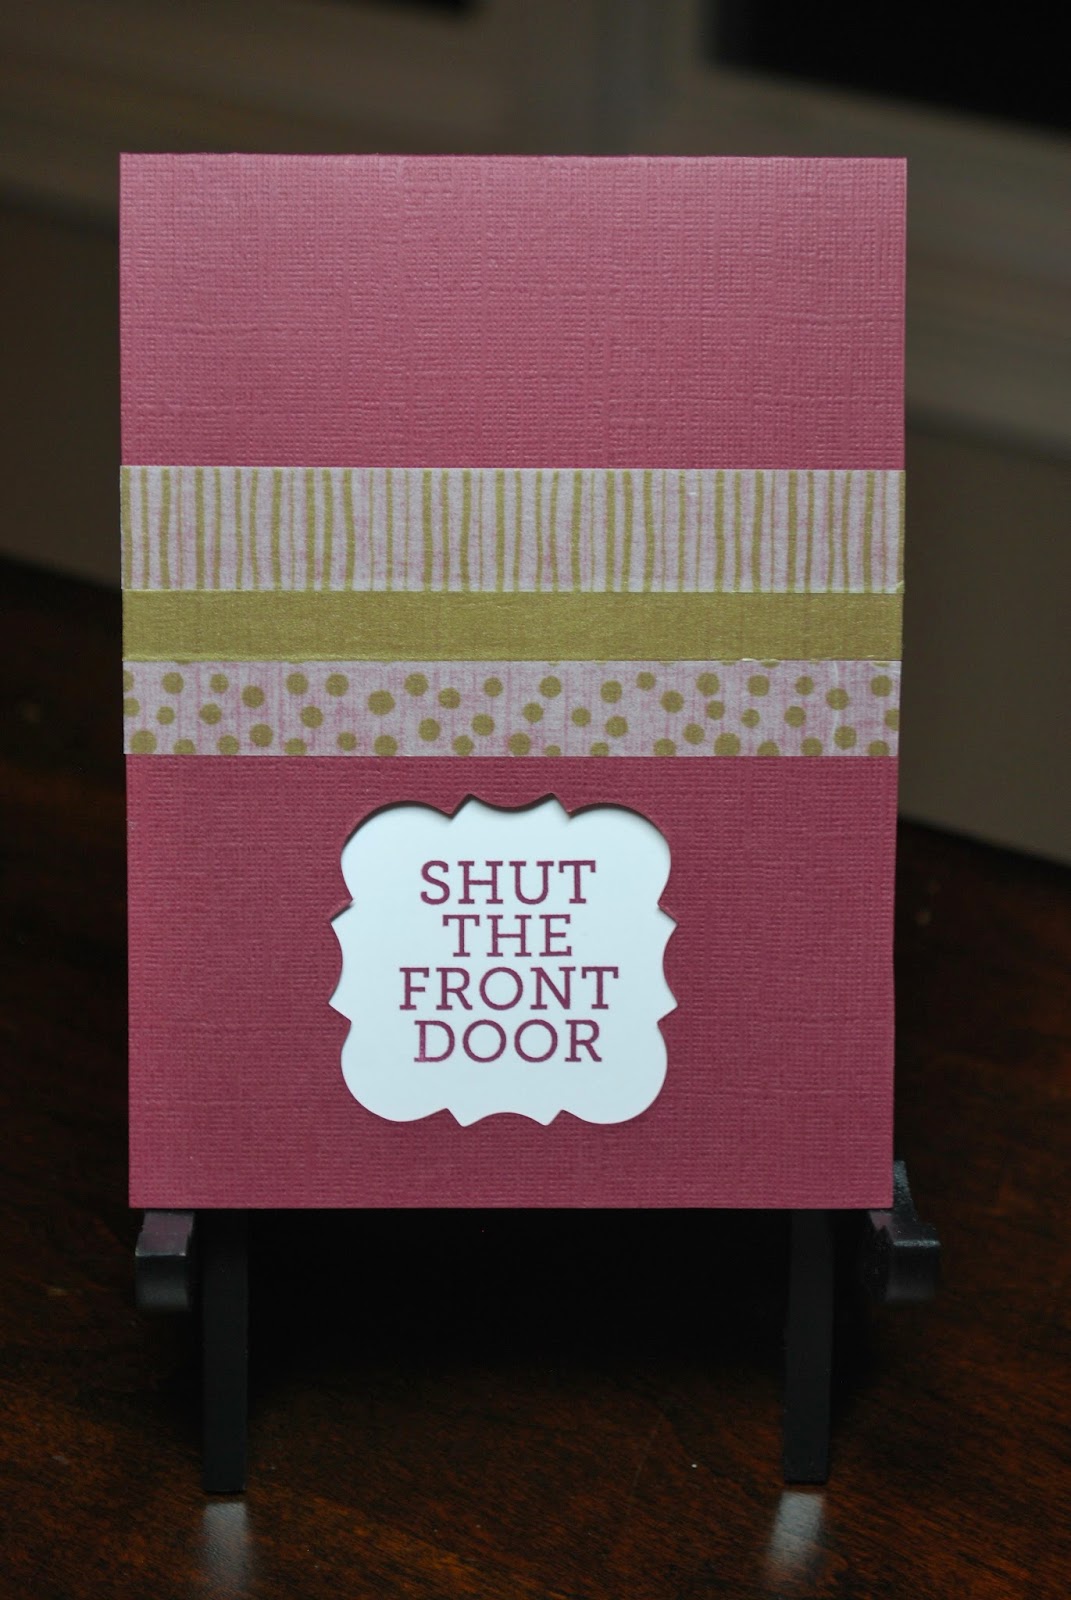
Within my Project Life extravaganza, a baby shower card was required.  This used the colors that the mama-to-be was using in the nursery.


All stamps are SU!, plus the hexagon embosser.  I used Tempting Turquoise as well.

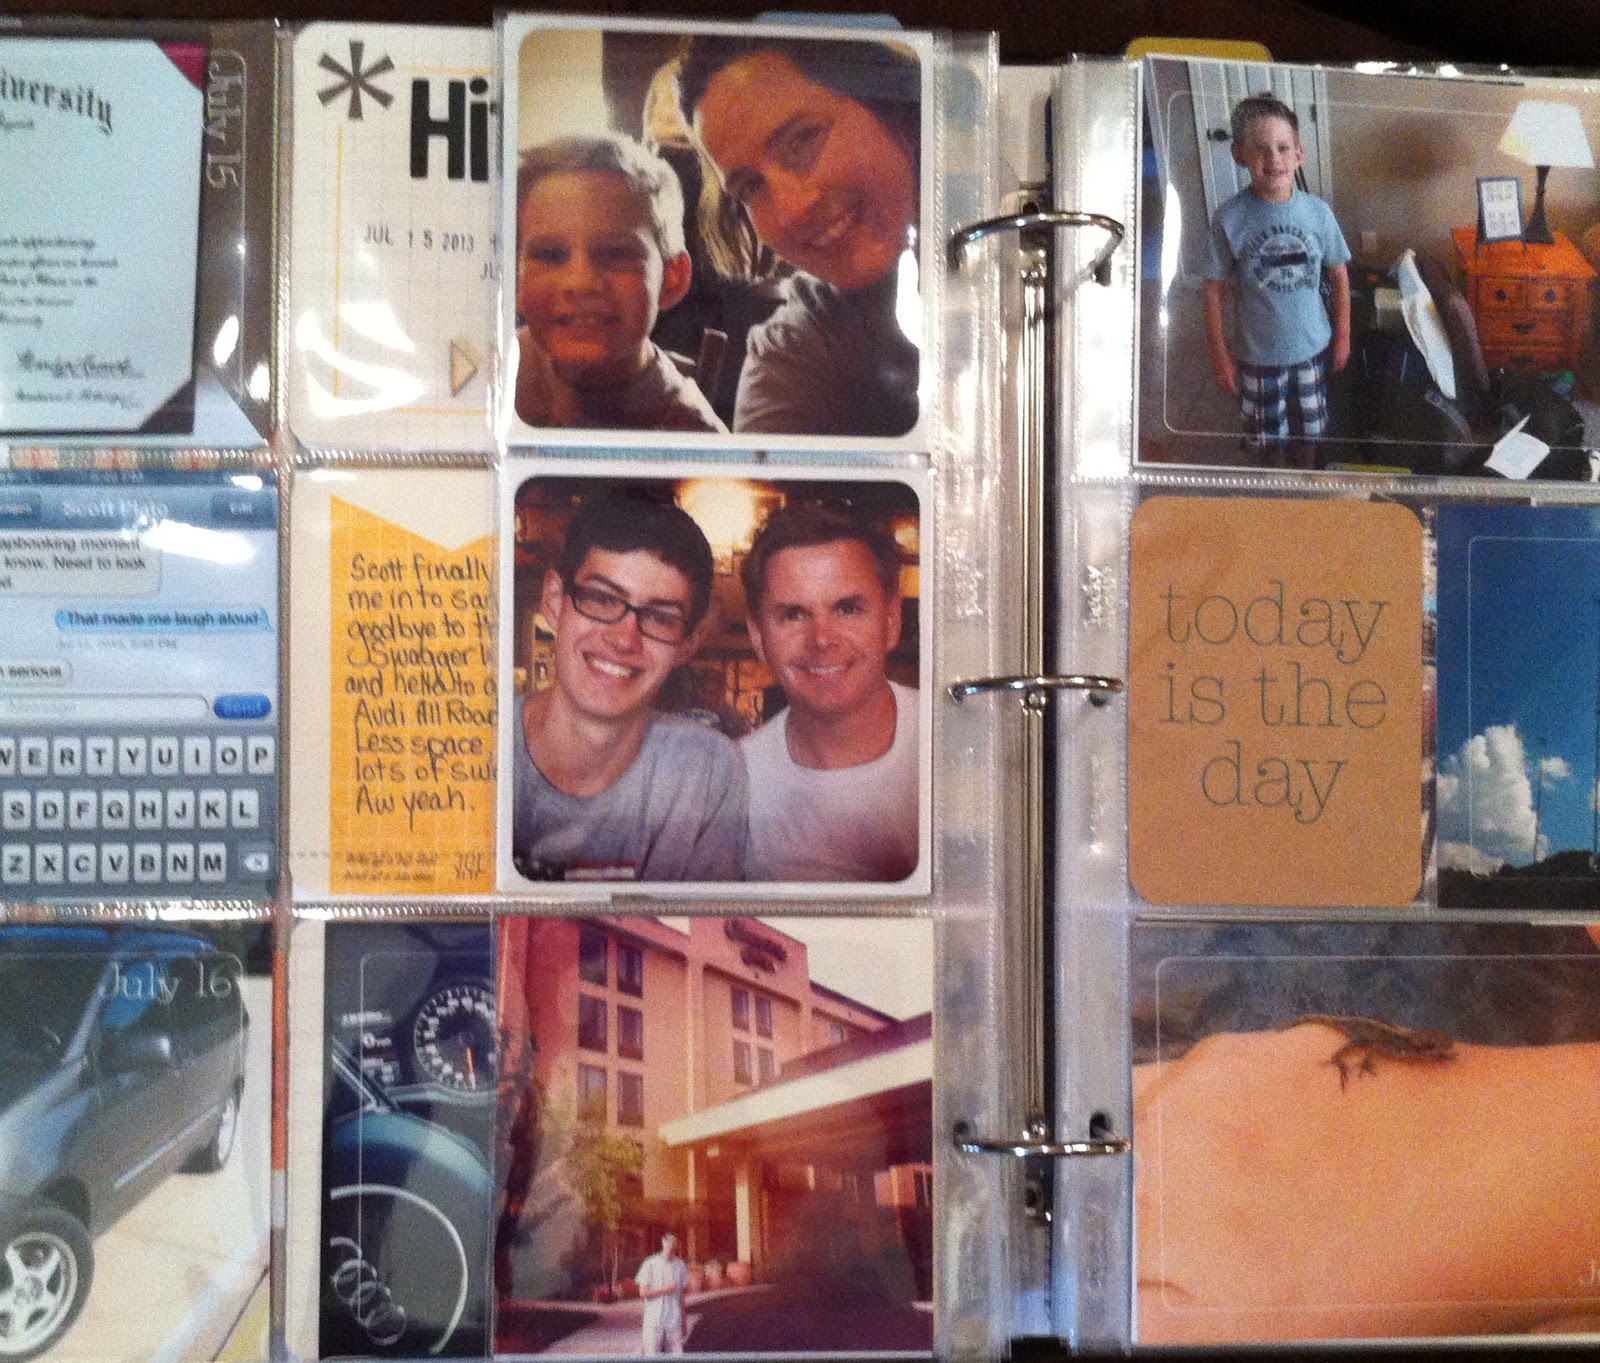
And now, to catch up with Project Life in my album, weeks 8 and 9...


I used the back of the Ali Edwards journal cards from Week 7 to journal on the first page this week.  Very handy!


I used a digital hybrid of the Rain edition from BH for this page.  Oh my do I adore the Rain edition.


First Fun Run of the year required several pics to archive the night.  I used a Flip Flap from CTMH for extra space.


This week was somewhat disappointing due to rainy weather the first week school was out.  The theme was, ironically, Carpe Diem.  Instead of focusing on what I could not do, I tried to shift focus to what I could.  


Lots of different product lines: Jillibean Soup, Simple Stories, Project Life, Jenni Bowlin...


Saw Ali Edwards write on a diagonal card, and I thought, "Well, duh!  That's a good idea!"  I also used one of the collection of roller date stamps I have been purchasing.  I have Amy Tangerine, Studio Calico, Dear Lizzy, and soon: Stampin' Up.  Fallen in love with them to my typical crazy level.

I think this week will be an entire spread of Rain edition, then I think Max will get full authority over the next week.  That should be fun!  Stay tuned!

I am currently prepping the NYC pics for print.  My son took outstanding (mostly portrait orientation) pics.  Time to get creative in a book that is mainly landscape.  All doable!