For months (yep, months) now, I have been involved in paper procrastination. I needed some reorganization of my scraps, and I just didn't know quite where I wanted to go with it.
I am happy to say, today was scrap paper day in the JoLynn craft room. Here's what I did:
- In 6 of my 2" craft organizer drawers, I have scraps of paper in the following categories:
~red and pink
~orange and yellow
~blue, green, and purple
~neutrals
~patterned paper
~card pieces (things that can be used as card parts)
I used to have these in large Ziploc bags, but that was not the most efficient use of space. I'm not sure this is, either, but it's a step up. Plus, in organizing, I also purged quite a bit that I knew I would not use.
-In one of my black cubes, I have a hanging file folder drawer. It used to be just for 8-1/2 x 11" cardstock in its entirety, but I added 5-1/2 x 8-1/2" cardstock to these files as well. I realized that I need another one of these drawer cubes, as this one is packed now.
-I filed patterned paper packs that were sitting around, too. These I keep in vertical Cropper Hopper (or Cropper Hopper-like) transcluscent paper organizers. These are housed in some of my black modular cube shelving.
Still on today's docket: finishing some of the shelf trays that I bought from Hobby Lobby ions ago. I want to Mod Podge them with patterned paper so they look a little cuter. Once I'm done, I'll post pics. I realized that it's been a while since I posted my scrapbook room in photos, and I have changed it quite a bit since it's debut on my blog. Time for an update!

Saturday, July 25, 2009
Simply Sent: For You Phrases
Well, I broke down and purchased a Simply Sent kit from Stampin' Up. SU! started these kits a few catalogs back. Marketed for neophyte stampers, these kits come with everything you need for several really nice cards.
In the past, I liked one or two things about the kits, but did not like them enough to pay almost $50 for a lot of things I didn't need. This catalog's For You Phrases kit was one that had enough things that appealed to me that I found it was worth the cost.
Now I will say that I broke the kit apart to place materials where they fit in the organization of my craft room. But, in taking these photos, I can recall what came with the kit should I want to assemble the cards as suggested. I may try one or two that way, just to not recreate the wheel. In all, this kit gets two thumbs up from me! I have created captions with the slide show below so you know what you're looking at.
Friday, July 17, 2009
Shoebox Swap
One of my favorite things is coming up next week: a shoebox swap. Such a celebration occurs when a few of us get together and bring a shoe/craft box with materials for the participants to make cards. This blog entry is my teaser to my people.
 The box shown gives a little idea of a way to organize for a swap such as this. I took a cue from Karen and put most materials needed in a Ziploc bag. This helped me with knowing whether or not I had enough materials for all participants. Other, more general needs are just placed in the box. I am so excited to see what cards my buds make!
Not that I wanted to be morbid, but I decided upon cards that people may not have a lot of in their stash... get well, praying for you, sympathy-type cards. I also have a growing pile pf perfectly good scraps 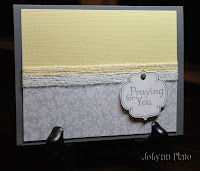 that I tried to use as a limit. That worked fairly well, although I have to say I was not 100% "scrapped" in my creations.
 that I tried to use as a limit. That worked fairly well, although I have to say I was not 100% "scrapped" in my creations.
Praying for You Card:
This card is mounted on a 4.25 x 5.5" SU! Basic Gray base. The next panel is a piece of textured paper in a sunflower-type color. The patterned paper is Bella Birds DSP from Stampin' Up! The sentiment (Thoughts & Prayers) and its frame (Great Friend) are also form SU! I found some very cool ribbon in my stash, and I had enough for about 4 of the cards. The others have a substitution of sheer white ribbon. I used a gray brad from Spa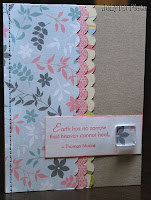 re Parts to mount the sentiment. I used SU! Basic Gray ink and Going Gray marker.
re Parts to mount the sentiment. I used SU! Basic Gray ink and Going Gray marker.Earth Has No Sorrow Card:
This card is mounted on a 4.25 x 5" Kraft cardstock base. The three layers of SU! DSP are punched with the SU! Scallop punch and then inked with the SU! Going Gray Marker. I think the DSP is from the SU! Spring Mini-Catalog... I can't really remember. Faux stitching was added to the top panel as well. The sentiment panel was stamped and inked in Cameo Coral using the Close as a Memory set. I then added a square piece from Tim Holz Fragments. I Mod-Podged this to a piece of the top panel of DSP, and then I cut and sanded around the sides. It is affixed using Memory Mount.
 The box shown gives a little idea of a way to organize for a swap such as this. I took a cue from Karen and put most materials needed in a Ziploc bag. This helped me with knowing whether or not I had enough materials for all participants. Other, more general needs are just placed in the box. I am so excited to see what cards my buds make!
Saturday, July 11, 2009
Jessica Sprague: Textures
 The theme for Day 5 was textures. This photo was taken last November when the snow fell on my pumpkins. While there was enough "concept contrast" in the photo already, I decided to play with this photo and adding textures.
First, it's easiest to desaturate the photo and start with a black and white or somewhere close to it. Then, I added three .jpg files as layers. Each time, I chose "soft light" for the layer, which gives the layer a translucency. The layers alone looked like: a crumpled up brown paper bag, a piece of slate, and a really old, battered photo in clear plastic photo corners. Click on the photo to get a better view of the textures.
Friday, July 10, 2009
Jessica Sprague: Clipping Masks
 This picture used a clipping mask in Photoshop. It was really quite easy, but I definitely needed instructions! The Grunge photo mask used was created by Jessica Sprague.
Jessica Sprague: Colorizing
 For this activity, our exercise was to colorize a photo, giving it a vintage feel. The toughest part to this was finding a photo that would really lend itself to the colorizing. This is the third photo I chose and the only one I actually felt turned out a bit on the side of "vintage."
Basically, we learned to manipulate the hue/saturation layers in Photoshop. We created some sharper colors and better contrast with our photos. Then, we created a

I definitely have to play with this more, but it's good to know how to do it. I have always wondered.
Also, as a bonus project, Jessica asked for us to use a frame and a star brush on our colorized photo. Here is my shot at that... using all the elements from the class so far...
Jessica Sprague: Brushes
 Oooohhhhh. I have heard people talk about "brushes" in Photoshop, but I just nodded my head as if I was "in the know." Oh no, was I not in the know. Being the stampaholic that I am, I have officially fallen in love with brushes. Done deal.
The photo is just one sample of one quick and easy brush selection. The frame in the bottom right corner was a brush for this class (as are all the embellishments we are using) from a House of 3 kit. When I completed the frame and word art from the previous post, those were separate PNG files. PNG files are files created with the idea that they will be used for layering... some parts of them are transparent to create a layered effect. The brushes, however, are used like digital stamps within the program. So I stamped that frame as if it were one of my rubber stamps. How cool is that?! I was also able to choose colors from my actual photo to use for the brush. I picked a color from Max's shorts for the frame and from his hair for the words. There are brushes that can be used that have words, but I decided to type "sprinkler fun" in.
E-A-S-Y!
Jessica Sprague: Frames and Word Art
 I am taking a free class at Jessica Sprague's site. Two thumbs-up to Jessica, as this is a great class! First of all, did I mention it is free? Second of all, her video tutorials are paced well. I kept up the whole time, and I got some good info on using digital elements with Photoshop. She's using CS4, but I am able to follow in CS2 (though I am wondering about an upgrade...).
So, behold! My first altered photo! We used a digi frame and word art for this. She used a different word art, but it didn't necessarily go with my pic. This has been altered so that it is ready to be sent off and developed. Kewl.
Tuesday, July 7, 2009
A Shoutout to KK-S
 For those of you that read this blog regularly, you know that I speak of one of my crafting buddies, Karen, quite frequently. She is the one I lovingly call my "dealer" for Stampin' Up! Lately, Karen has been deeply enmeshed with a few things that have kept her from her craft groove. Her family is building a house (which will be so pretty and includes a craft room that looks dy-no-mite). She has become certified to lead group fitness classes, her favorite being Zumba. She is establishing herself in town as an instructor. So, as far as crafting is concerned her time has been limited.
Since she is an apartment-dweller, today the "stamping ladies" came to my pad to check out the new catalog (40 MB .pdf file). This card is the make-and-take Karen offered, using the new In Color palette. This was a lovely, simple card, and I know she has no time to post it, so I am posting it for her. Here are her deets:
Size: 4.25 x 5.5"
Cardstock: SU! white and Soft Suede
Inks: SU! Rich Razzleberry, Melon Mambo, Bermuda Bay, Soft Suede, and Crushed Curry
Stamps: SU! Fundamental Phrases and Circle Circus
Various scallop and circle punches
Dimensionals
Saturday, July 4, 2009
To the Moon and Back
 Today's Inspiration Challenge asked us to go to Posters.com for inspiration. The site has tons of Rolling Stone covers as poster-sized images, so I decided to browse them to see what would come. It's funny how inspiration can come from the simplest of places.
 I love Tom Hanks. I think he's brilliant. So, when I saw his RS Cover poster, I stopped just to see which era of Hanks it was showcasing. Looks like his Big era. I love how they kept this cover very simple. Black, white, blue. Works well. So I went with that.
From there I decided to pull together the black paper and blue paper that would best flow with the inspiration. I had just downloaded some free (yes, free) digital packages from Summer Driggs, and I remembered a piece of black and white patterned paper that caught my eye. I accidentally printed it out on photo paper, but I think that was one of those "happy accidents."
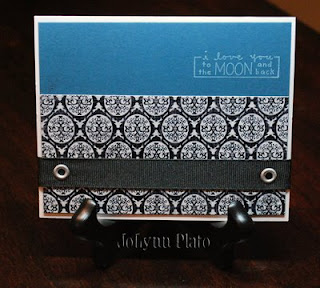
I chose the A Muse sentiment for a few reasons. First, one of my FAVORITE movies with Tom Hanks in it is Apollo 13. Second, it fit the simplicity I was going for and matched up with the white-on-blue of the words "Rolling Stone" on the cover. And third, a shoutout to the 40th anniversary this month of the lunar landing.
Size: 5.25 x 4.25"
Paper: Summer Driggs Limeade; SU! Blue Bayou; white
Stamp: A Muse To the moon and back
Ink: SU! Kraft White
Accessories: Offray black grosgrain; jumbo silver brads
Friday, July 3, 2009
My First Larger Canvas
 My BFF Jessie needed help with a project. Her sweet mama turns 70 this year, and her family is throwing a party for her tomorrow (July 4). One of her sisters suggested a family tree canvas. {Background: Karen, fellow BFF, made a beautiful canvas for Jessie's birthday. I believe they replicated the canvas for more family members.}
The basic recipe:
Canvas: 36" x 48" purchased at Hobby Lobby {n.b. not a cheap canvas size by any stretch of the imagination... pardon the pun}
Leaves: Color Box Cat's Eyes in Olive Pastel, stamped directly onto the canvas
Sky {seen more clearly IRL}: Color Box Chalk Ink in Ice Blue
Tree truck: Color Box Chalk Ink in Chestnut Roan
Grass: Color Box Chalk Ink in Olive Pastel
Sentiment: American Crafts Pajamas Thickers (brown)
Leaves with pictures: various SU! green cardstocks
I used the ink pads for ink application and when more of a brush was needed, I used disposable sponges. Each leaf has a different family member's name and a photo (1" x 1") headshot. The leaves were adhered with Alene's Tacky Glue. The eight main children were popped up on dimensionals. Jessie's mother's picture is on the trunk of the tree.
Thursday, July 2, 2009
Fare thee well
 Today's card follows the Ways to Use It challenge. We were asked to use corrugated cardboard for a card. I needed a card for a friend who is moving to England, so I decided to give a farewell card a try.
I always like the word "farewell," as it is giving a person the wish of having good travels. You are wishing that they "fare" well. So I wanted to stress the two parts of the word. I used some flocked alphabet from Spare Parts for the "fare." I found that the adhesive backing on these was nonexistent! So, I used some glue and all is well. The "well" is formed from Wilma chipboard letters by Basic Grey. They have matching alphabet stickers on 12 x 12 sheets.... how easy is that! No sanding, no craft knife!
I punched the scalloped circles from a Huggies wipes box I had. MAN are those things strong. The box actually had two corrugated layers, so I had to do some separating. My scallop punch was not too excited with me, but I finally got two good punches. I inked them with Cat's Eyes in Chestnut Roan. I also inked the outside of the card with this same color. The patterned paper is SEI's Dill Blossom. You can't tell, but it is textured and lovely. I added some American Crafts Flair (Bon Voyage) to the scalloped circles for a touch of travel. The card base was from a ready-to-use kit I had, measuring 5 x 6.5".
Wednesday, July 1, 2009
Sketch Challenge Meets Color Challenge
This card was designed for a friend who is waiting on some things that are out of her control. Man, who doesn't know what that's like? In education speak, we call it "delayed gratification," and it's supposed to be something that every child experiences to avoid becoming too egocentric (world revolves around you mentality). Well, by the time you are an adult, delayed gratification goes from waiting until after dinner to play with your toys to waiting on a mortgage approval or waiting on a job interview or waiting on your next paycheck. Get it? As hard as it was when we were kids, but involving things of strong significance to our well beings.
Well, a friend is waiting to hear on a job that she really wants. Her main reference is out of town until after the 4th, so no decisions will be made until then. It's driving my friend a little nutty. Another teacher thing: we really DO work over the summer. We mentally and physically get into next year's game. This year, I learned that I was going to teach 4th graders three da ys before school began. That is not optimal. Although I LOVED my kids and had a GREAT year, I could have been even better with a little more time during the summer. I have that this year, and I am looking at next year in a much different way.
 ys before school began. That is not optimal. Although I LOVED my kids and had a GREAT year, I could have been even better with a little more time during the summer. I have that this year, and I am looking at next year in a much different way.
Now, back to the card. We were permitted to use squares... mine are a bit more rectangular because measuring is something I don't do patiently. The middle section of the card was supposed to hold something different. Mine has a small popped up flower image that might be hard to see in the photo. It goes with my sentiment's "smallest wishes" idea.
I also used this week's color challenge again because, well, I really like the colors: SU! Kraft, So Saffron, and Night of Navy. It looks black on the pic, but it really is Night of Navy. Other inks used: SU! Wild Wasabi and Color Box Chalk Ice Blue. Another thing that might be hard to see are the embossed lines (thanks, Scor-Pal!) that frame the sentiment. This card measures a wee 3-3/8 x 4-7/16". I know... that measuring again. I just cut until it looked reasonable.
Subscribe to:
Posts (Atom)