Monday, January 28, 2019

Prayers


I was attempting a couple of things with this card.  I wanted to make a blended background with some Distress Oxide inks.  I wanted to see how the Mandala Maker set worked with white ink.  I wanted to use a die cut word that had dimension. 


If I had it to do again, I would rotate so the colors were horizontal.  I would also attempt either heat embossing the white or using Staz On white so the pattern stands out.  I used Hero Arts white, and it did not stand out on this background as much as I wanted (each stamp was stamped twice).  Otherwise, I love the basic concept of this card. This Hero Arts set and die never get old.

Friday, January 25, 2019

Wintry Day

Today was pretty cold, and Max and I had off of school.  Despite a trip to Springfield with Scott, I pretty much hibernated, which is my happiest thing to do.  I love sleep.

Max worked on finishing up a latch hook project that he started a few years back and for which he had just renewed his crafting fervor.

I worked on a card for his brother's birthday, using my SU! Starburst Sayings set (retired).


I CASEd this card, using materials I had on hand.  I tell you what, inking that big old stamp was no easy task.  My Not Quite Navy from Stampin' Up! just was not "inky" enough.  I finally used some Ali Edwards ink to get a nice, thick coat.  I was worries that the sentiment would not be as sharp, but it actually stamped nicely.  I went back over some light spots with a paintbrush.  I used the same ink on the smaller sentiment, and silver ink on the lower left image.  I had the foiled bar ready to go from a previous foiling session.

Let's talk about my love-hate Thickers relationship.  The adhesive tho.  The longer you have them in your stash, the longer the adhesive either rips your chipboard letters or completely stops working on your vinyl letters.  It's an easy, but annoying, thing to fix.

My kid is turning 22.  I can't even believe it. 

Monday, January 21, 2019

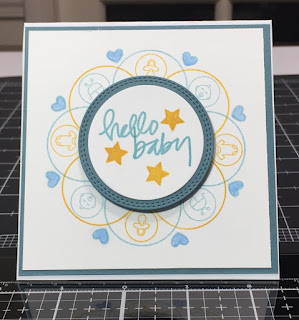
Hello Baby

Babies, babies, everywhere!  I needed a shower card for a baby boy shower.  So, I busted out my new favorite tool yet again.  The Gina K Wreath Builder.


Stampin' Up! stash, yet again, comes through.  Brocade Blue (or Bordering Blue...I get the two mixed up) and Crushed Curry inks and cardstock made a nice combination for this card.  I used Gina K's Mandala Maker and Ali Edwards' Baby 4 x 6 Stamp Set to create this 4.5 x 4.5 card.

Apocalypse Now - Plato Uses Pink

I hope all is well with your soul because between the lunar eclipse and this card, the end is nigh. One word: Pink.

More specifically: Stampin' Up! Cameo Coral, a color I tried to sell at the Crafters' Garage Sale because it still had the sticker on it.  These inks are FABULOUS with the Gina K Wreath Builder.  

I have some confessions, though.  I created my own 4.5 x 4.5 template for this one using my Silhouette and a transparency.  Gina K's currently only goes up to 4 x 4.  Also, I got more than a little inspiration from this crafter, Melanie Muenchinger:


Some light shading with a pink Prisma (I want to say Rose Pink) and Gamsol, and...voila!  Done.  Pfft.  I made a million mistakes at first trying it on my own, so I followed her pattern almost exactly.  That is a good way to get started with the Mandala Maker set.  It gets you comfortable with the different designs the stamps can form.

Saturday, January 19, 2019

Wreath Builder Madness

I have been making some cards with Gina K's Wreath Builder.  I have enjoyed them very much.  The first two cards were inspired by the third. 


This one is all Gina K.  I used some Distress Ink for the circles.

I actually used circles from an old Papertrey set for this one.  The sentiment is from Simon Says Stamp.  I used Stampin' Up Real Red for the circles.  The inner heart was colored with a Prisma and Gamsol.  This card is for a shoebox swap.


The blog post for this card can be found here.

When Cardmaking is NOT Therapeutic


I wanted to scream in the process of making this card.  Full on, chest hurting, scream for the neighbors.  Here's my story.


This is the instigator.  Oh my, did I love this card.  I was going to try something a little different with the flowers since I did not feel like "experimenting" with my Silhouette and/or fussy cutting.  Things I learned:
  • I have a crappy reserve of black cardstock.  Seriously.  It's the worst. And black cardstock is completely unforgiving when you are embossing (and yes, I brushed it down with the magical powder).
  • I have two Versa Mark pads.  One is great and recently-purchased.  The other is currently in my trash can as I bought it ten years ago.  Guess which one I used first.
  • Foiling on stamps is a hit or miss operation.  Tonight: miss.  Multiple times.
  • If you stick an already-embossed stamped image through a laminator, you will ruin the image. 
  • My Nuvo drops that I have not yet used have completely disappeared.  Poof! I bought them this summer.  I have a spot in the craft room where I put stuff like that.  Not there.  Not anywhere.  And that kind of crap makes me NUTS!
 I do love the card I finally made.  But for the love...what a ridiculous process when I just wanted to get my creative juices flowing.  The stamp set was one I fell in love with when I bought it.  I also used some glittery, tiny flipping stickers that covered for the absence of the Nuvo drops (Saint Anthony, Saint Anthony...).  Here's a closer view.  Yeah, it's sideways.  Because that is the perfect ending to this 2-hour ordeal of a card.


Sunday, January 13, 2019

Cards for the Stash

I have officially been a full-on paper crafter for about 11 years.  "Full-on" meaning buying the goods and occasionally using them, making scrapbook pages and cards, and stamping with all the tools. When my mom visited last year, I encouraged her to go through a bunch of my card stash and take what she liked/needed. She has recently mentioned the need for sympathy, thinking of you, and kids cards, so I assured her I could hook her up.  As I went through my stash, I decided it was time for a purge.  I was never going to use some of these cards.  The design was meh, the ink was fading, or I just did not like it.  It was a bit freeing, but almost like throwing money in the trash.

Segue to this card.  I just got the Gina K Wreath Builder Bundle, and I decided to take it for a spin.  The result:


As a kid, I loved me some Spirograph, and I even have one in my classroom.  So this little stencil makes me quite happy.  The sentiment is from SSS inked with Hero Arts ink.  Pretty sure the red cardstock (it's either Real Red or Ruby Red) is SU! as well as the blue base (I have a LOT of Bordering Blue).  The white?  Part of a card I cut off so I could reuse it.  The other inks: The blue and orange/yellow are Distress Oxides, and the red is from Ali Edwards.  

Oh and...my Tim Holtz glass mat.  Holy guacamole.  I love this thing so much.  It actually helps my pens write better (I learned that accidentally). I strongly recommend it.

All for now.  Snow makes my crafting genes go nuts, so there may be more.

Saturday, January 5, 2019

OLW 2019 begins!

More crafting...it's crazy. 

I started a 3 x 8 album for One Little Word this year.  My word is namaste, and I am finding it has so many layers.  Here's my January spread and reflections.


3 x 8 linen album is a newer size for me.  I did my 2018 December Daily in this size as well.


Silver foiled tag from Ali's collection


Gotta love Cracked Pistachio from Tim Holtz 


Additional panels and embellishments come from my collection of Ali Edwards stuff.


Foiled!


Well, hello.  It's Crafty JoLynn, Teacher JoLynn's happy cousin, and it's Winter Break, so you know what that means!  Woo hoo!

There's a whole story to go with today's cards, so sit back, relax, and enjoy.

It all started in December, when Kim and I traveled to our favorite little-scrapbook-store-that-could, The Paper Forest, in Washington, IL, because it was hosting Gina K of Gina K Designs.  Truth be told: Kim followed Gina more than I had at that point.  I had done some foiling experimenting here and there, and I liked it, but it was some serious work (see my 2015 December Daily).  The main issue was that to foil well, your images needed to be printed on a laser printer, which I had no intention of purchasing.  I had purchased some adhesive and attempting stamping, a la Jennifer McGuire, but that required more patience than I tend to have. So it was with some trial and error that I came to this class.


Gina has a product line called Foil Mates. This class introduced us to the ease of their use in making absolutely beautiful cards, like this one.


Seriously simple and amazingly gorgeous.  We left with three cards and a bunch of purchased product (well, I did...Kim is way more conservative).  Kim also gifted me some great products for Christmas, and I gifted her a laminator, so we were ready to rock.  A play date occurred.  Reality came with it.


Imagine the profanities.

No, these things did NOT happen when Gina's smiling face was in front of us.  Man was this frustrating.  Rather than producing, our afternoon (and several days after that) was spent troubleshooting.  Why was the foil being finicky? Was it is?  Did we need a minc (we used mincs in Washington)? Why had I not had previous issues like this with foiling?

I e-mailed Gina K Designs, and Kim and I both scoured the digital crafting world, because we knew we could not be alone.  Here's what we now know to be helpful:

- Your laminator needs to be WICKED hot.  The typical 15-minute warm up is not sufficient.  You have to give it about 30.
-Dusting the image (similar to what one does before heat embossing) is a solid choice.
-A shim of 3-4 pieces of cardstock and a piece of parchment paper surrounding the "foil sandwich" helps tremendously.
-Putting the image through the laminator 2-4 times is another part of the success insurance policy.
-If you die cut, it's best to do so AFTER you foil, as your plates might cause dents in the image, and thus, trouble for the foil.

Now, we might have it down to a science.  Check these babies out:


Ah yes, THAT is what the previously-shown trial was SUPPOSED to look like.


Check out that shine.  I had to include a close-up.  Foil cards are a challenge to photograph! The background is from Taylored Expressions.  Cute?  Cute.


The stamped image on this final card is foiled in gold. I am not sold that the process is easier/better than just embossing in gold.  I followed Jennifer McGuire's tips for foiling on stamps.  It was not a flawless process, but I am glad I found some success with it.  It gives me a much broader range of use for the foil.

You may have noticed one additional card.  This one has no foil.


I have been watching a lot of tutorials for Gina K's wreath builder system.  I ordered one, but again, I lack patience.  So, I created my own stencil and gave it a try with a Papertrey set (Background Basics: Venice - no longer available through Papertrey) that was sitting around waiting to be inked (for, no joke, years).  Each of the images is a separate little stamp, and, with the MISTI and a template, a circular design of many colors was created.  There are some imperfections to my imposter system, but it allowed me to try out the concept.  There are MANY videos of ways cardmakers use this tool.  More to come, for sure!  Her daughter, Rina K, got me excited for the Mandala Maker set, which reminded me of the Papertrey set I already owned. Rina's You Tube videos crack my butt up!