Those of us who are "old school scrappers" find the repetitive nature of the cards to be limiting. We had to remind ourselves to expand our creativity as far as we wished---use embellishments and letter stickers and such.
- The last time I did PL, I worked with entire double-page spreads. This put the "creativity pressure" on me to make them cute or dramatic...definitely unified. This time, I am attempting a Project 365 picture-a-day. At first, I thought, "I have lost my mind!" However, it has freed me beyond belief. The unity comes in the random nature of the photos. It's just...life! If I see something that deserves more than that, I will expand it to its own page.
- Those who are newer to scrapbooking look at this and are a little intimidated. We have established that some monthly "Project Life" dates will be needed (and fun!). However, as a seasoned PL-er, I know exactly how easy Becky has made this, and, with a little help, the newer scrapbookers will get the cadence with very little instruction necessary.
- The journaling is also intimidating to newer scrapbookers. That's where the wordless or practically wordless cards come in. Look cute with no pressure! I have a sample below.
- I am not using my printer, if I can avoid it, for photo printing. I learned that fading occurs over time, depending on the ink, the paper, the storage area...so many variables. So, I am sending a week at a time to CVS. Why not wait until I have 50 photos and get the "deal?" Because we are talking about less than $3 a week for photos that I know will last. Also, I need the more immediate visual of my page. That means some planning that is different from normal. I took some pics of the process rather than the finished product for those who need to see a way to attack this.
Note the divider. A. I love chevron, therefore, it was an automatic score! B. I love that it was not month-dependent. I am starting at the end of March, so the divider says "March-April." You don't even need to use it to state months. Brilliant to keep these blank, Becky!
Journaling need not be paragraphs of correct grammar. It is about thoughts. I like the addition of cards that allow you to jot a few words about the photo. I also appreciate the small nature of the cards. If you have more to say, use the folded cards. Or, you might see in the future my branching out to little flip pages that I have seen on Pinterest. I used the date stamp that was included with the original PL a few years back. These are also available at office stores or craft stores.
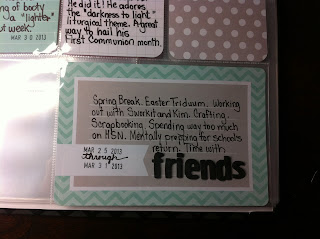
An anchor is important to me. I like the larger cards with several lines where I can do a brief summary of the week. I might not do this every week, but the option is there.
Here is a sample of a treated photo. Now, if you are new to photo documenting or scrapbooking, do not make this your goal. This added time to the process for sure. However, I wanted to allow you to see how I was connecting pictures, dates, and journaling.
I did not put the dates in a consistent place, because sometimes the white would be on top of white in the photo. I am OK with the inconsistency. That's huge for me to even type. :)
When I get the photos, I will show the whole shebang.


No comments:
Post a Comment