Wednesday, December 30, 2009

A Challenge

I was in need of one more birthday card. I saw that Ann was hosting the latest challenge at the Everything But the Kitchen Sink Challenge. Perfecto!

The challenge included the use of wrapping paper. I pulled out some of my Martha Stewart Confetti wrapping paper from EK Success for a birthday card for my grandmother's 97th birthday. I wanted to stay simple and let the pattern speak for the card. So, I decided to use my SU! scallop circle punch and the idea of repetition. I stamped the Happy Birthday sentiment from the SU! So Many Scallops set using the method of coloring the stamp with markers (SU! Yo-Yo Yellow, Old Olive, and Going Gray). I punched that and then punched several shapes from the wrapping paper.

To give dimension, the sentiment and one of the other shapes is popped up on a Dimensional. I had to back the wrapping paper scalloped circle with cardstock because it was too flimsy alone to be popped up on a Dimensional. I inked the main panel (SU! Going Gray) and the scalloped wrapping paper shapes with my Going Gray marker. For three of the scallops, I added some corduroy brads. I mounted the Going Gray panel on to some Georgia Pacific white cardstock.

Simple. Doable. I like it.

Tuesday, December 29, 2009

Two-card Tuesday

Hey, I might have to make this a habit. It's a catchy title.

Today, I had some of my crafty ladies over, Ann and Karen. We had one of those, "We should get together and craft over Christmas break," discussions, and it actually happened. Yeah us! Later, our friend Jessie brought over milkshakes. Yeah squared!

But, I digress. I had an idea that we should bring a scrap of paper for others to make cards. You know you always have a scrap laying around somewhere. Ann brought over this cute SU! patterned paper from the Pink Flamingo collection. The red floral part is actually the flipside of the yellow floral. I went with the idea, originally, of staying monochromatic. Then I felt some green (Color Box Olive Pastel) ease into the act to edge the circles. It was all flat circles until I saw Ann mass-producing these cute circle flowers, and I knew I had to try one. I have no idea where the button came from, but it seemed to fit just fine. I also inked the edge of the outside of the card with the Olive Pastel and stamped the sentiment (SU! You Make Me Happy) in the same ink. This card makes me happy, especially since I used SU! Summer Sun cardstock on a wintry day.

Yes, I made TWO cards. That's what happens when I hang with these people. I decided to use the other half sheet of SU! Summer Sun cardstock. I had gotten the paisley (Traditions Floral Paisley from The Paper Studio) out for my other crafters and ended up using it myself! I liked that it had a hint of the yellow in it already, and I accented with some SU! Basic Gray. I also used my Fiskars scallop blade to add some fun along the edge. I do not know where I got the ribbon, but I think it matches quite nicely, though I was tempted to use a little Basic Gray taffeta. The sentiment, stamped in SU! Craft White, was from the SU! On Your Birthday set. Making this reminds me to get some cards out to my January 2 birthday relatives! I am always late with those!

Monday, December 28, 2009

Sew complex

Okay, well, I did complete several stitches. That's a good thing, Martha would say, yes? I can't seem to get the machine to make different types of stitches, but I threaded the needle and the bobbin and got it going... enough for today!

Questions remaining: What are the best settings for paper stitching? Why does the back of my stitching look awful? How can I get the machine I have to create different stitches (I turn the dial that I believe should change it, but that's not occurring)?

Tomorrow is another day...

Sew ignorant

OK, this break, I decided that having two sewing machines in my house and no clue how to use one was unacceptable. My smallest goal: to be able to do some stitching on paper crafting. My largest goal: make an article of clothing. My need: to figure out how in the h3#l to get the mechanism to do what it is supposed to do.

I looked for video tutorials, but, even though they said they were for "beginners," there was a lot of hidden lingo and assumptions. Plus, even though machines have similarities, they are not all the same.

My next step was to search Singer's site for the manual for my machine. Success! It is a free download... $15 if you want a hard copy. I did print it myself, as reading online while looking at a sewing machine is a bit challenging. Now, I am off to figure this out. More to follow.

Saturday, December 26, 2009

Winter Break has its rewards

Between yesterday and today, I finally had the "mass production" drive to get my Christmas cards finished and mailed out. I surprised even myself. So, after going to the post office, I decided a trip to Hobby Lobby to help my depleted adhesive stash was in order.

Lucky me, adhesive was 30% off. Also, there was a Tombo MonoAdhesive 3-pack refill for $10. Sweet. Was I honestly going to stop there? After all I had worked through? Of course not! After all, I still had the 40% off coupon in my wallet, and since adhesive was on sale...

I came upon a We R Memory Keepers Crop-A-Dile Corner Chomper. I had seen Kristina Werner use hers on pretty much every video she does, and I like the idea of something that can round more than a piece of patterned paper. This is also a nice tool because it will cut at two radii, 1/2" and 1/4". I thought I would do some pics so you could see the ease of its use.

Step 1: Open the guides.
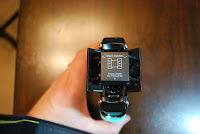

Step 2: Place paper in size you desire.
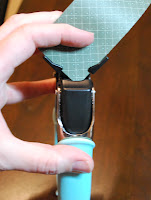

Step 3: Chomp. I show in this pic the differences in the rounding of the corners.
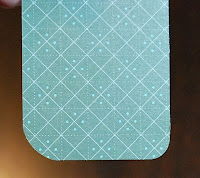

Step 4: Empty the waste bin. I love that it catches the corners!
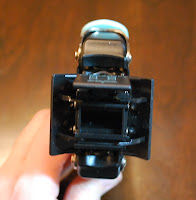
Another find that I was excited about helped me to solve this issue:
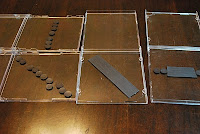
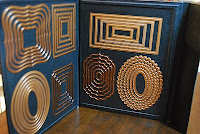
I had storage "issues" with my Nestabilities purchases. For a while, I stored them in empty CD cases that had adhesive-backed magnets in them, There were two problems with this: 1. The magnets did not always hold, so the dies were not really secure. 2. I stored them in a place where it was a pain to take them out. Therefore, I did not use them as frequently as I could have. 3. They took up more room than I really liked, as I could only fit one set per CD case.

Enter the Quick Kutz Magnetic Storage Book (30% off today... woot woot). Take a peek:
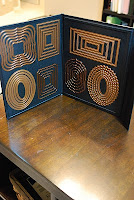
Yep, it's a magnetic book... slim... it closes... and I fit 7... S-E-V-E-N... Nestabilities die sets in one. It retailed at HL for $12.99. If you are familiar with Quick Kutz, all of those dies are small, thin, and metallic, so I think their organization/storage people deserve a raise for this one. Brilliant.

I also purchased some Thickers... yep... 30% off, too. I noted that The Paper Studio has their version of Thickers available, and they were cute, however, they were falling off the sheet as they hung there. Bad sign for someone wanting them to stick in a scrapbook.

Look soon for more postings by me. I want to wait until a few things I have been working on actually get to the people for whom they are intended before I post here. I am anxiously awaiting the Project Life kits from Becky Higgins. Can't wait to get going with that!!

Tuesday, December 22, 2009

One World, One Heart

...let's get together and feel all right...

In an effort to make 2010 as crafty as possible, I decided to commit to the following. Got a blog? Join in! Thanks, Ann, for the shout out to this event. It's as hippie as this conservative girl gets. :)